> For the complete documentation index, see [llms.txt](https://help.dscout.com/llms.txt). Markdown versions of documentation pages are available by appending `.md` to page URLs; this page is available as [Markdown](https://help.dscout.com/private-panels/panel-management/create-upload-and-manage-panelists.md).

# Create, upload, and manage panelists

There are four ways to add panelists:

1. **Uploading a CSV file:** Add multiple panelists simultaneously by uploading a CSV file containing their information.
2. **Manually create a panelist:** Add panelists individually by filling out their name and email directly in Private Panels.
3. **Through a study screener:** Capture panelists' names and email addresses through a study screener.
4. **Through a panel sign-up form:** Capture panelists' names, email addresses, and more through a panel-specific sign-up form. For more information, see [Panel sign-up forms](/private-panels/panel-management/panel-sign-up-forms.md).

## Uploading panelists for the first time

{% hint style="warning" %}
You must remove all emails from your CSV which have previously bounced, opted out, or marked you as spam.
{% endhint %}

{% stepper %}
{% step %}
Create your desired [Panel Properties](/private-panels/panel-management/panel-properties.md)

{% hint style="warning" %}
**Important:** for *single-select* and *multi-select* properties, **keep the Options empty** for now. We will update the Options in the last step.
{% endhint %}
{% endstep %}

{% step %}
[Upload your CSV](#updating-panelists-via-csv)
{% endstep %}

{% step %}
Go to **Panel Panel Properties** and for your *single-select* and *multi-select* properties\_, [populate the options from your uploaded data](/private-panels/panel-management/panel-properties.md) automatically.
{% endstep %}
{% endstepper %}

## Upload panelists via CSV

If you have panelist data in a CSV file, follow these instructions.

{% hint style="warning" %}
**Important:** The first row of the CSV file must be the column titles as shown in the image below:
{% endhint %}

![](/files/b7cbdb2f84d7104ec18b4de96fb133d07503523f)

Private Panels will match these column titles with existing ones in the system. If the column title is not a match, Private Panels will create new columns.

Once your CSV file is ready to go, follow the steps below to upload it to Private Panels:

{% stepper %}
{% step %}
On the **Panelists** page, click the **New Panelists** drop-down button. Then, select **Upload panelists**.

![](/files/befb670addc32396c904d08d85c91341715ecd9d)
{% endstep %}

{% step %}
The **Upload panelists** pop-up will appear. You can upload a file here in two ways:

* Click the **Choose file** button on the pop-up. Your computer system's file explorer will open where you can select the CSV file containing panelist information.
* Navigate to the CSV file on your computer's file explorer then click and drag it to the purple area on the pop-up.

![](/files/a249db65e65bdcb5172b2b0322ca9eb46c5a6afc)

{% hint style="info" %}
You can also hit the **u** key on your keyboard to open the **Upload panelists** pop-up when in the **Panelists** page.
{% endhint %}
{% endstep %}

{% step %}
Once uploaded, Private Panels will match the first row of the CSV to existing column titles. The column titles with a match will have a green check while those without a match will be marked with a red x.

![](/files/cdebc9d95ce989406a2cfd78e7c6a78698f436f2)
{% endstep %}

{% step %}
If there are unmatched columns, the summary will be displayed at the bottom. Tick the **Yes** checkbox beside **Skip unmatched columns** to exclude the unmatched columns from the import.

![](/files/b0f67e5f08c0ce141fd8cd29458acdb02d68b1ac)
{% endstep %}

{% step %}
To keep an unmatched column, click the corresponding **Select Column** drop-down button. You can try to find a similar/alternative column title by typing it on the search bar. If there is, click it from the drop-down options. If there is no alternative column title, click **+** **Create Panelist Property.**

![](/files/0dd404e6a60051f8be5ebe55c55414146f5bfe3d)

![](/files/825e02a413bb93fa086174d55574ec0ba90a1b06)
{% endstep %}

{% step %}
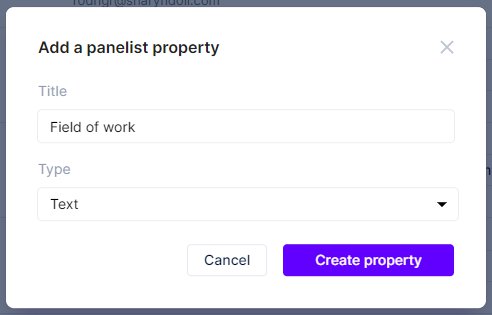
The **Add a panelist property** pop-up will appear. Type the column title on the **Title** textbox and select the panelist property type by clicking the drop-down button below **Type** then selecting from the options. Then, click the **Create property** button. Click here for more information about panel properties.

<div align="left"><img src="/files/2284316f3ae3f92e4f899a1019cc3b81b0bf4167" alt=""></div>
{% endstep %}

{% step %}
Once the column titles have been matched, or set to be excluded from the import, select the source of the upload by clicking the drop-down button beside **Source of upload**. Select from the options that appear.

![](/files/eaad86c9c55eafbed8411a1516247c717432916b)
{% endstep %}

{% step %}
Lastly, click the **Import Panelists** button to start the import.

![](/files/c04054701b9fdf62d6edccaa37a76fff263693cb)
{% endstep %}
{% endstepper %}

## Manually add a panelist

Follow the steps below to manually add one panelist at a time:

{% stepper %}
{% step %}
On the **Panelists** page, click the **New Panelists** drop-down button. Then, select **Create new panelist**.

![](/files/befb670addc32396c904d08d85c91341715ecd9d)
{% endstep %}

{% step %}
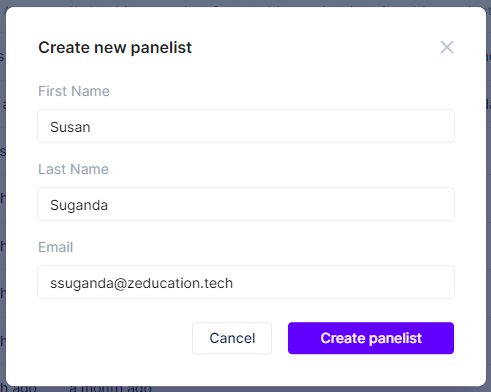
The **Create new panelist** pop-up will appear. Type the panelist's information on the appropriate textboxes. Then, click the **Create panelist** button.

<div align="left"><img src="/files/c1c0f7e7cd0fa1f64eae38ff6ee2f10ce3ebb8c5" alt=""></div>

{% hint style="info" %}
You can also hit the **n** key on your keyboard to open the **Create new panelist** pop-up when in the **Panelists** page.
{% endhint %}
{% endstep %}

{% step %}
This will open the created panelist's profile view. You can add more information on their profile by filling out the different fields within the profile view. To know more about profile view, click here.

![](/files/b5a9b7136b1cc1c5582e942b0b9dac636f64e060)
{% endstep %}
{% endstepper %}

## Add panelists through a Study Screener

Your company must have an existing study before you can use this method. If there's none yet, you can read our Creating a new study guide to know how.

If there's already an existing study, you can follow the steps below to add panelists through a Study Screener:

{% stepper %}
{% step %}
Navigate to the **Studies** page. Then, open the study containing the Study Screener that you'll use by clicking it.

![](/files/f4d825b4b502dd20100106ee2d445b99093a34f0)
{% endstep %}

{% step %}
Click **Screeners** then open the Study Screener you'd like to use by clicking it. If there's no existing Study Screeners yet, you can create one by following our Creating a Study Screener guide.

![](/files/fb2b84b47282457a954c8541cb9770e89c4b8bd4)

The screener you choose must include a required question asking participants to provide their email address with the **Two-way** **panel property sync** enabled.

![](/files/f12ff7143518f570efea5539ec50d870c0820c9e)
{% endstep %}

{% step %}
Open the **Screener Settings** tab. Within the **Internal Details** section, only study participants are allowed to take the screener by default. This is to align the study with appropriate panelists.

![](/files/61d1c0cb098e98d2adf0b586c3459cde0ff70977)
{% endstep %}

{% step %}
Change the participant settings by clicking the drop-down field beside **Who can take the screener?**. Then, choose **Anyone (even people outside my panel)** from the options.

![](/files/ba59baae66c15525ec3bffa385b2fcf37bd7ecf7)
{% endstep %}

{% step %}
Then, click the **Copy** button within the **Public Details** section to copy the Study Screener link and share it to potential/target panelists.

![](/files/01e535b5feb8c7aad96a25550061c35f07751c45)
{% endstep %}
{% endstepper %}

## Updating panelists via CSV

If you have new data that you want to add to multiple existing panelists, you can upload a CSV file with the new data. Keep in mind that the first row of the CSV file must be the column titles as shown in the image below:

![](/files/566d3b9d4393b94d071b035b9256b864af7b7893)

{% stepper %}
{% step %}
When you add new information via CSV, any new columns will create new panel properties, while existing columns will not create new panel properties. These properties will be matched to whatever respondent matches the email in the CSV row.

For example, in the CSV screenshot above:

* if those emails already exist in the Private Panels Panel, those panelists in Private Panels will have each of those values updated or added.
* if those emails DON'T exist in the Private Panels Panel, new panelists will be added.
  {% endstep %}

{% step %}
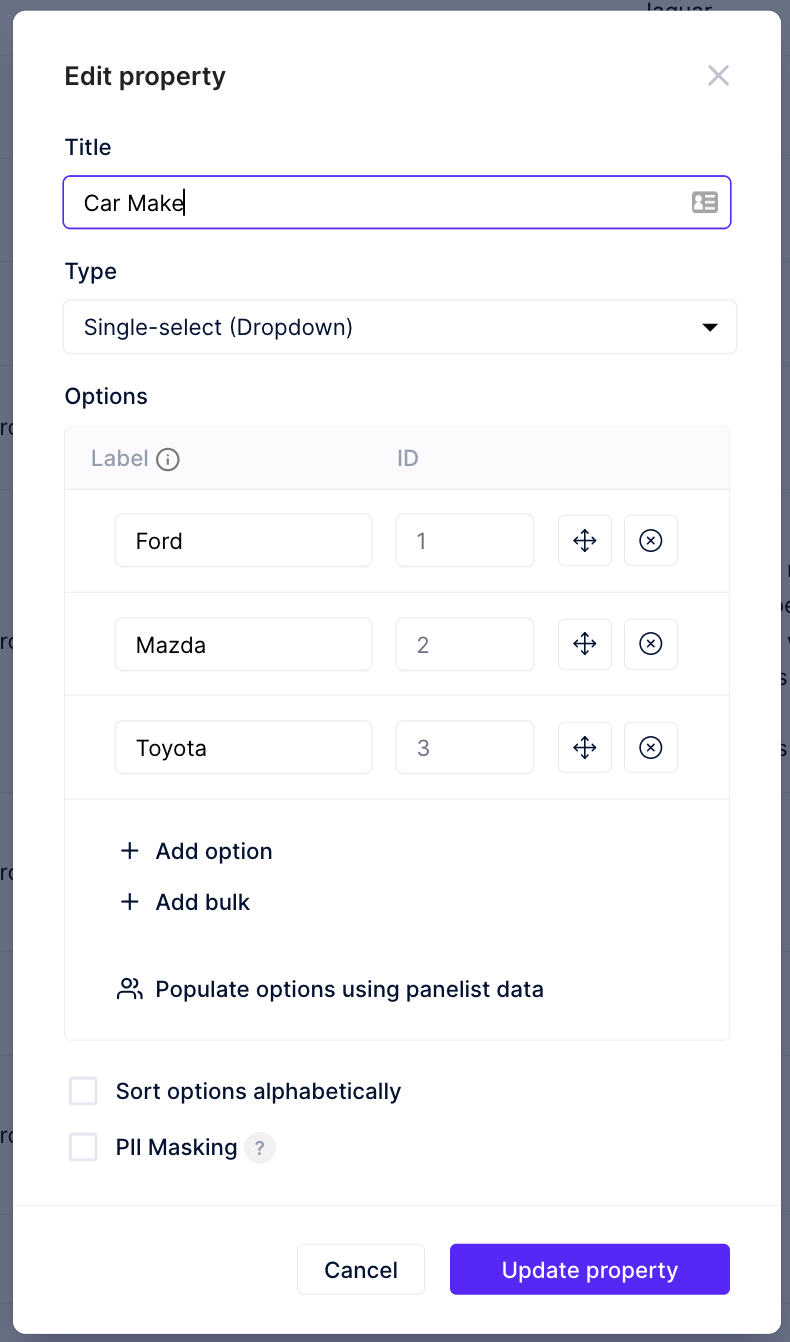
When you are updating a panelist panel property, make sure that the option you are adding matches either the label or the id of the panel property option.

For example, if the panel property is Car Make, and the options that are programmed into the panel property are Ford, Mazda, and Toyota, the CSV cell can contain either the label (Ford), or the ID (1) (see below).

<div align="left"><img src="/files/ca89448269d45b99e32ec68b91b08216bf34d729" alt="" width="375"></div>

![](/files/f63831eb2b497b678ed7d0e784aa27130ff1ee51)
{% endstep %}
{% endstepper %}

## Uploading respondents directly into a study

Follow [this guide](/private-panels/studies/upload-respondents-directly-into-a-study.md).

{% hint style="info" %}
Private Panels was previously managed outside of Dscout, so you may see a different logo and URL in some places. If you have any questions, contact <support@dscout.com>.
{% endhint %}


---

# Agent Instructions
This documentation is published with GitBook. GitBook is the documentation platform designed so that both humans and AI agents can read, navigate, and reason over technical content effectively. Learn more at gitbook.com.

## Querying This Documentation
If you need additional information that is not directly available in this page, you can query the documentation dynamically by asking a question.

Perform an HTTP GET request on the current page URL with the `ask` query parameter, and the optional `goal` query parameter:

```
GET https://help.dscout.com/private-panels/panel-management/create-upload-and-manage-panelists.md?ask=<question>&goal=<endgoal>
```

`ask` is the immediate question: it should be specific, self-contained, and written in natural language.
`goal` is optional and describes the broader end goal you are ultimately trying to accomplish on behalf of the user. GitBook uses it to tailor the answer towards what is most useful for that goal.

The response will contain a direct answer to the question and relevant excerpts and sources from the documentation.

Use this mechanism when the answer is not explicitly present in the current page, you need clarification or additional context, or you want to retrieve related documentation sections.